
# Access TBS License Server
# TS-WI-RMP-FACILITIES - TBC - Access License Server.docx
# 1 Purpose
The purpose of this document is to describe how to access the ThinkSpatial Trimble Business Centre (TBC) Lecense Server. Acces to the license server (via the internet) is required to use the licensed features of TBC (e.g. baseline processing, export, reports, etc.).
# 2 Before you Begin
You will require the following before you begin this work process
# 2.1 Data
- TBC License Server details
- IP Address: 52.88.200.33 (as of Nov 2015).
- Port Number: 1947 (default).
# 2.2 Software
- Trimble Business Center (TBC)
- Web Browser (Chrome, Firefox)
# 3 Introduction
To access the TBC License Server you will need to complete three configuration steps.
- Configure TBC.
- Configure Sentinel Admin Control Center.
- Configure Windows Firewall.
Be patient as, sometimes the changes take time to come into effect (e.g. you may have to restart TBC a couple of times).
# 4 Configure TBC
In the following steps you will enter the license server details in TBC. Note that a license will not become availiable until after you complete the remaining steps.
- Start TBC
- Select Support > License Manager from the ribbon. You do not need a project open to do this.
- In the Search Type dropdown box, Network
- Enter the IP Address of the TBC License Server (provided above) in the Liscad Server field.
- Wait a few seconds while TBC spins its wheels. Note that nothing much will happen the first time you do this (i.e. it may look like it hasn't worked).
- Click OK. TBC will inform you that the changes will take effect next time you start TBC.
- Proceed to the next section (without closing TBC).
# 5 Configuring Sentinel Admin Control Centre
In this section you will configure the Sentinel License Client running on your computer so that it can access the TBC License Server.
- You should still have TBC open (from the previous section) so select Support > License Manager from the ribbon.
- In the bottom left corner of the License Manager dialog there is a link to the Sentinel Admin Control Centre . Click this link.
- The Sentinel admin Control Centre will be displayed in yout default web browser.
- Click the Configuration menu item in the left hand menu.
- Click the Access to the Remote License Managers tab.
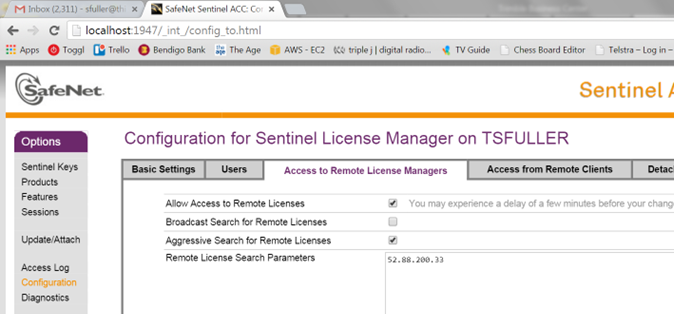
- Change you settings to match those shown in the image above (bearing in mind that the IP Address of the Lincese Server may be different).
- Click Submit.
- Close the web browser.
- Close TBC.
# 6 Check the TBC License Server Connection
You may now be able to access the TBC License Server. Follow the steps below to check if you have access to the license server and can obtain a license.
- Start TBC
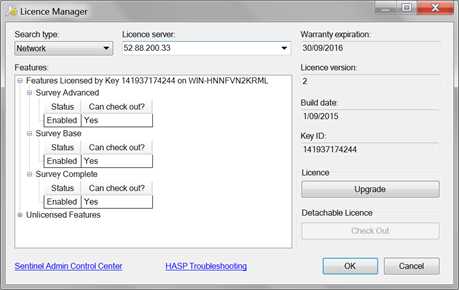
- Select Support > License Manager from the ribbon.
- If the license server is availiable (and there is a license availiable) you should see details similar to those bin the image below. You can now procees to use licensed features in TBC.
- If you do not see settings similar to those above or you are unable to obtain a license the two most liekyl reasons are:
- Windows firewall is blocking the connection (see Section 7).
- A license is not availiable (you'll have to wait until one is free, check with other people who might be using TBC).
# 7 Configure Windows Firewall
If you are unable to access the license server, it may be because Windows Firewall is blocking the connection. If this is the case, you will need to configure Windows Firewall to allow inbound traffic on port 1947 (the port used by TBC License Server). You do so by adding inbound rules to your firewall settings.
WARNING
Please do not attempt these steps until you have checked with your supervisor that there are not other issues with the TBC License Server.
- Click the Windows button (or press the Windows Key) and type Windows Firewall into the search bar. Windows Firewall with Advanced Secturity should come up as one of the results under Programs. Click on Windows Firewall with Advanced Security to open it.
- The Windows Firewall with Advanced Security dialog should be displayed.
- Right-click on the Inbound Rules item in the tree view (left hand side) and select New Rule.
- Complete the New Inbound Rule Wizard with the following values:
| Item | Value |
|---|---|
| Rule Type | Port |
| Protocol | TCP |
| Port | 1947 |
| Action | Allow the connection |
| Profile | Select all availiable profiles |
| Name | TBC License Server (TCP) |
- Repeat Steps 3 & 4 for UDP by changing the Protocl value to UDP.
- You should now have two new inbound rules (one TCP, one UDP) for Port 1947. This should be sufficient to allow TBC to access the license server.
- Repeat Section 6.